Enhancing The Revell 1:72 S-100 Class Schnellboot
Model Owned By: T. Garth Connelly
Model Built By: Stan Pienkowski
Photos By: Tom Connelly, Rob Mitchell and Stan Pienkowski
Article By: T. Garth Connelly & Stan Pienkowski
A few years ago, Revell of Germany had the foresight to answer the prayers of many ship modelers around the world by releasing a 1:72 scale kit of the armored Kalotte bridge S-100 Class Schnellboot. Prior to the release of this kit, the only plastic kit available to ship modelers in the late 1970s and early 1980s was the oft-maligned Airfix kit of the pre-World War Two S-10 in 1:72 scale. Last year, my Uncle surprised me by building me an example of this kit straight from the box. That model showed me how good - on its own merits, this model is. Although, I am sure that a modeler could and would find errors and inaccuracies in the kit. All I know is that I was grateful to my Uncle for building me the model.
NOTE: on all photos shown here if you click on the photo you will get a larger version
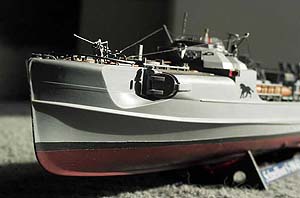
Angle off the port bow. In this shot, you can see the kit provided Panther motif decal.
Condor Decals of Argentina produces an aftermarket decal sheet that is a vast improvement.
(Tom Connelly photo)
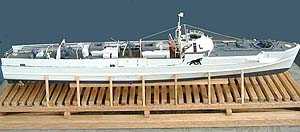
The finished S-204 built by Stan Pienkowski. (Rob Mitchell photos)
I am not saying that the Airfix kit can't be built up into a respectable looking model with a lot of work because it has accuracy issues. However, that is a topic for another article, not this one. This article is intended to shed light on the construction of this "new" kit and how to enhance it with after-market accessories and matched paints. However, modelers should be made aware of something; the price tag of the kit itself, and all of the after-market "goodies" is rather high. I, myself was taken slightly aback when I tallied up the totals for everything and saw that it came to a grand total of $128.55. However, if you want to rationalize the expenditure for a project like this one, the finished model will be worth the money.
The following items were used in the construction of this project:
- The Revell (of Germany) 1:72 scale S-100 Class Schnellboot kit
- White Ensign Models' Photo-etched frets
- Classic Warships' white metal propellers
- Steve Nuttall's brass barrels for the kit's guns
- Condor's (Argentina) decal set
- BECC's (from Loyalhanna Dockyard) cloth flag (Kreigsmarine)
Here is a run-down of the approximate costs that a modeler would be looking at in connection to a project similar to this one:
| Revell (AG) 1:72 scale kit of the S-100 |
13.89 Pounds (GB) (Approx. $27.50) |
| White Ensign Models' Colourcoat Paints |
$6.60 |
| Condor Decals (from Argentina) (from www.greatmodels.com) |
$14.95 |
| Classic Warships' 1:72 scale white metal propellers (from Pacific Front Hobbies) |
$6.00 |
| BECC Model Accessories' 1:72 scale Kreigsmarine cloth flag (from Loyalhanna Dockyard) |
$11.00 |
| White Ensign Models' photo-etched Fret-B for the Type VII U-boat in 1:72 scale- for the Naxos Radar |
5.00 Pounds (GB) (Approx. $10.00) |
| Turned Brass barrels for the kit's guns (from Steve Nuttall of Canada) |
$15.00 |
| White Ensign Models' Photo-etched Fret for the S-100 kit |
26.34 Pounds (GB) (Approx. $37.50) |
| Grand Total |
$128.55 |
I realize that the price is rather steep. It is almost enough to make some people think about taking on a second mortgage on their house. I know that when I saw the $128.55 grand total, I stammered like Ralph Cramden on The Honeymooners. But, now? Let's see how the model was built up.
Construction:
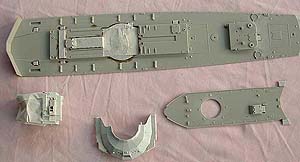
Before starting the construction on Revell's 1:72 S-100 kit, several corrections had to be made. These changes were made to have the model depict a specific boat, for which we had photos. One of the flaws in the Revell kit concerns the forward gun tub. The tub's raised details had to be removed so that it would be flushed with the deck and the circumference made a little wider.

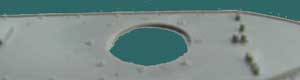
These two photos show the corrections to the forward gun tub opening.
(Stanley Pienkowski photo)
In order to accomplish this, the gun tub below deck level had to be scratch-built. Another change concerned the after deck, where the smoke generators were located. Revell made the mistake of placing the smoke generators directly onto the deck, whereas the actual generators were on raised platforms. On the model, two of the rings that were molded on the deck were removed. A shim replaced these so that they would be raised up off of the deck. On the outer two rings, it was possible to cut under the bases so that they looked like they were off of the deck.
Ready for painting (Stan Pienkowski photo)
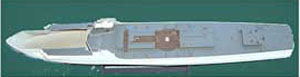
The painted hull and main deck. (Stan Pienkowski photo)
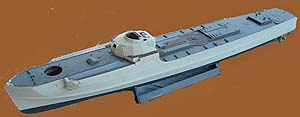
The completed hull and superstructure. (Stan Pienkowski photo)
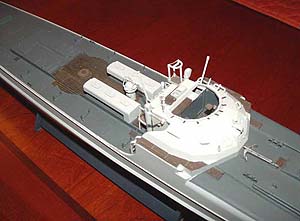
Detail photo of the model's Kalotte bridge. (Stan Pienkowski photo)
Other changes to be dealt with were the torpedo storage racks, the raised platform around the torpedo sighting device on the bridge, the portholes in the wheelhouse side access doors, the torpedo tube doors and the ammunition ready service lockers. Revell molded the torpedo storage racks with a flat top section. The racks should have had curved shaped to them. This was corrected by removing the molded on racks and replacing them with the White Ensign Models' photo-etched racks.
The problem with the platform on the bridge was corrected by removing its supports and on the forward inside wall of the bridge and just dropping the platform to the deck. The portholes in the wheelhouse side access doors were fixed by filling them in, sanding and painting them.
Another problem that had to be remedied was reversing the torpedo tubes' loading doors to their correct positions, Revell molded them on incorrectly. Additionally, the visible part of the two torpedo tubes was too long. This was corrected with a knife and sandpaper. Revell molded the ammunition ready-service lockers' hatches' tops were molded with a forward tilt to them. For some reason, Mr. Pienkowski did not address this issue.
One other "error" in the kit was that Revell depicted what is supposed to be the exhaust opening and the bilge drain as just raised bumps. This error was corrected with the use of a drill and a small file.
The two hull halves were glued together. Using masking tapes and elastic bands, the hull was glued from the inside, so that the glue would not seep through to the outside of the hull. After the main deck was installed, to strengthen the hull, painting begun.
Masking of the major components for painting.
(Stanley Pienkowski photo)
Before painting the hull, the deck was masked. The paints selected to be used on the model came from White Ensign Models' Colourcoats line of matched paints. These were Schnellbootweis, Dunkelgrau 51 and Dunkelblaugrau. The Schnellbootweis was for the hull and superstructure, the Dunkelgrau 51 was for the decks and the Dunkelblaugrau was for the bottom of the hull. It should be noted that care should be taken while handing parts painted with the Schnellbootweis as the white picks up dirt and body oils from your hands.
It was at this point where all of the detail parts were put onto the model and the kit's guns' plastic barrels were replaced by the well-made, lathe-turned brass barrels made by Steve Nuttall of Canada.
Finally, using ¼ inch mahogany strip wood, Mr. Pienkowski fashioned a flat launch stand as a base for the completed model.
Conclusion
Whereas this kit, built straight from the box is quite an impressive model, coupled with all of the aftermarket accessories currently available, it can be transformed into a stunning model and I'm really pleased at how it turned out.
Please feel free to send me examples of your modeling. I would love to feature the work of others here at PT Boat World! Email me for specifications for inclusion in this web site.
|